From Legacy VMs to Cloud-Native Applications: Practical Workload Migration Strategies with Google Kubernetes Engine.
From Legacy VMs to Cloud-Native Applications: Practical Workload Migration Strategies with Google Kubernetes Engine.
From Legacy VMs to Cloud-Native Applications: Practical Workload Migration Strategies with Google Kubernetes Engine.
From Legacy VMs to Cloud-Native Applications: Practical Workload Migration Strategies with Google Kubernetes Engine.
From Legacy VMs to Cloud-Native Applications: Practical Workload Migration Strategies with Google Kubernetes Engine.
Blog Summary
Many VM-to-GKE migrations appear successful at cutover, but issues surface later: OOMKilled events, HTTP 502 responses during rollout, or data loss from local container storage. Early workload assessment prevents most of these failures.
Blog Details
Why GKE Migrations Fail Weeks After Launch
Many VM-to-GKE migrations appear successful at cutover, but issues surface later: OOMKilled events, HTTP 502 responses during rollout, or data loss from local container storage. Early workload assessment prevents most of these failures.
Kubernetes exposes assumptions that long-lived virtual machines can hide, especially around memory, storage, identity, startup, and shutdown.
The guide follows the migration lifecycle from assessment to decommissioning and focuses on decisions with lasting operational impact.
Why This Guide Exists
This guide turns recurring migration lessons into a practical review path for engineers modernising applications on Google Cloud.
What This Guide Covers
· Building a container image that behaves correctly under an orchestrator
· Creating a GKE cluster with the security and networking defaults set correctly the first time
· Writing a Deployment that survives rescheduling, rollouts and node upgrades
· Cutting over as a weighted traffic shift, with a rollback that actually works
· Decommissioning the source estate safely
· The seven failure modes behind most post-migration incidents
Key Takeaways for a VM-to-GKE Migration
• Assess each workload separately. Replatform, refactor, rehost, or defer based on evidence.
• Measure CPU, memory, ports, storage writes, dependencies, and latency before defining container resources.
• Use Workload Identity Federation instead of exported service account keys.
• Plan VPC-native networking and IP ranges before cluster creation.
• Use startup, readiness, and liveness probes for different health decisions.
• Move production traffic in controlled stages and retain a tested rollback path.
• Decommission the legacy environment only after validation, ownership approval, and retention checks.
Key Concepts
Twelve terms that the rest of this guide uses without stopping to explain. If these are already familiar, skip ahead.
Term
What it actually is
Cluster
The whole GKE environment: a control plane plus the machines that run your applications
Control plane
The Google-managed brain of the cluster. It decides what runs where. You never patch or restart it
Node
One virtual machine inside the cluster. Your application actually runs here
Pod
The smallest thing GKE runs: one or more containers that share an IP address and start and stop together. Pods are disposable and get replaced routinely
Container image
A packaged, read-only snapshot of your application and everything it needs to run
Artifact Registry
Where container images are stored so the cluster can download them
Deployment
The object that says “keep three copies of this pod running”. It recreates pods when they die and handles version upgrades
Replica
One running copy of the pod. Three replicas means three copies
Manifest
A YAML file describing what you want to exist. You send it to the cluster and the cluster reconciles reality against it
Rollout
Replacing running pods with a new version, a few at a time, without taking the service down
Probe
A health check GKE runs against your container to decide whether it is alive and whether it should receive traffic
Namespace
A folder inside the cluster that keeps one team's workloads separate from another's
Two Recent Platform Changes That Older Guides Get Wrong
Two platform changes affect migration planning and older implementation guidance.
Container Registry Is Shut Down — Artifact Registry Is the Target
Container Registry as a Google-hosted product is gone. Writes to gcr.io stopped on 18 March 2025, reads stopped on 3 June 2025, and from 14 October 2025 all gcr.io URLs are served from Artifact Registry, with anything never copied across now unavailable.
Any tutorial that tells you to configure Docker authentication with no arguments and push to a gcr.io path is describing a service that no longer accepts your images. Artifact Registry is the target, and its hostnames are regional — the location is baked into the hostname rather than passed as a setting. A repository in Mumbai lives under an asia-south1 host, and an image reference that omits the region will not resolve.
Autopilot Mode Can Now Run Inside a Standard Cluster
A Compute Class is a workload-level setting that tells GKE what kind of node to run a pod on. Autopilot ComputeClasses are now available inside Standard clusters, which means you can run specific workloads in Autopilot mode — Google-managed nodes, billed per pod request — while the rest of the cluster stays on node pools you control.
This allows a Standard cluster to retain self-managed node pools while selected, validated workloads use an Autopilot ComputeClass.
Before You Start: Choose an Approach and Confirm Readiness
Strategy is set per workload, not per estate. Most teams replatform first — container in, architecture unchanged — and refactor later, against real production telemetry rather than assumptions.
Approach
What it means
Choose it when
Replatform
Container the application with minimal change; architecture stays as it is
The app containerizes cleanly, or you are exiting a data centre on a deadline
Refactor
Decompose into services, externalize state, adopt cloud-native patterns
The workload is strategically important and release velocity is the constraint
Not every workload belongs on GKE. Infrequent jobs, appliances, or host-dependent applications may be better rehosted or deferred.
Readiness Checklist: Five Things to Confirm First
Work through these before the first workload moves. Each has an artifact that proves it is done — a written answer, a diagram, a captured baseline. “We discussed it” does not count.
Check
Done when
Statefulness audit
Every workload has a written answer to: where does it write? Anything writing to local disk needs a PersistentVolume or externalization before it moves
Network design
A Virtual Private Cloud (VPC)-native cluster, with pod and service IP ranges sized for three years of growth. Range exhaustion cannot be fixed in place
Identity model
Workload Identity enabled, so pods authenticate as a Google service account without a key file. No exported service account keys anywhere in the design
Data migration
Databases and file shares have their own track (Database Migration Service, Storage Transfer Service) with a tested rollback
Observability baseline
Current 50th, 95th and 99th percentile (p50, p95, p99) latency, error rate and resource use captured from the legacy system
An observability baseline provides the evidence needed to confirm that latency, errors, and resource behaviour have not regressed after cutover.
How to Size Containers: Measure the Workload, Do Not Copy the VM Spec
A workload on a virtual machine with 4 virtual CPUs (vCPU) and 16 GB of memory almost certainly does not need 4 vCPU and 16 GB. That figure was chosen years ago with a comfortable margin, and copying it into a resource request carries the guess forward and multiplies it by the replica count.
Instead, capture what the application actually uses over a full business cycle, month-end included. Three measurements are worth taking before anything moves:
• Peak memory and CPU across a sampling window long enough to include the busiest hour of the busiest day, not an average over a quiet afternoon.
• Every port the process is listening on. Each one becomes a Service definition, and any port nobody can account for is a finding in itself.
• Open file handles against the local filesystem, excluding shared libraries. This is the list that tells you which workloads are quietly stateful — and it is almost always longer than the team expects.
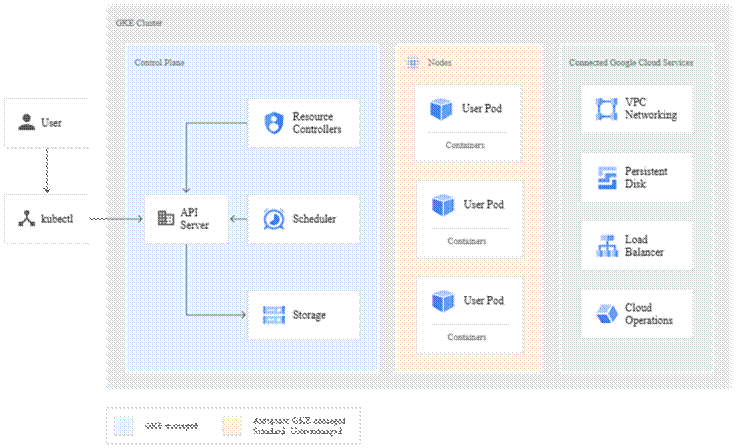
Target Architecture: What You Are Building
Workload Identity, Secret Manager, centralised logging and the VPC design are far cheaper to get right before the first workload moves than to retrofit across forty namespaces afterwards. Retrofitting Workload Identity in particular means recreating node pools — a maintenance window per cluster, which means the work never quite gets scheduled.
Step 1 — Build a Container Image That Runs Safely on GKE
In plain terms: Take the application and package it into a container image. The decisions in this one file determine whether it survives contact with Kubernetes — most images that crash in production do so because of a choice made here, weeks before anyone noticed.
Most images that fail in production fail for the same handful of reasons. They run as root. They ignore the container memory limit. They do not handle SIGTERM, the signal Kubernetes sends to ask a process to shut down. And they ship an entire operating system worth of known vulnerabilities, catalogued as CVEs — Common Vulnerabilities and Exposures.
None is exotic, and all are fixed in the build rather than at runtime. The production pattern is a multi-stage build: one stage compiles the application with the full toolchain available, a second copies only the resulting artifact onto a minimal runtime base, creates a dedicated non-root user with a numeric ID, takes ownership of the application directory, drops to that user, and starts the process container-aware.
What Each Build Decision Prevents
Decision
Prevents
Multi-stage build
Shipping the build toolchain and source code to production. Cuts image size by 60–70% and removes a whole class of findings from vulnerability scan results
Non-root numeric user ID
Rejection by Autopilot and hardened Standard clusters. Setting the user ID (UID) as a number rather than a username also lets the cluster validate that the container genuinely is not root
Container-aware heap sizing
CrashLoopBackOff with exit code 137, the signature of an out-of-memory kill. Older Java Virtual Machines read the node's total memory rather than the container limit — on a 64 GB node with a 2 GB limit, the JVM sizes its heap for 64 GB and the kernel kills it
Exit on out-of-memory
A Java Virtual Machine that has exhausted its heap but keeps its network socket open, failing health checks slowly while still accepting traffic
Test the image locally before it goes near a registry, and test it under constraint rather than on a laptop with 32 GB free — an explicit memory ceiling and a read-only root filesystem. The read-only filesystem is the important part: it surfaces every hidden write path at your desk, instead of at three in the morning when a pod reschedules.
Push to a Regional Repository, Deploy by Digest
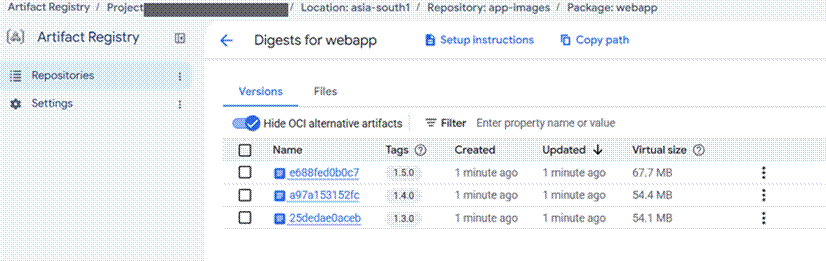
Creating the repository and configuring Docker authentication against the regional host are one-time operations. After that the build, tag and push cycle is conventional — the only difference from older guides is the hostname, which now carries the region.
Once the image is pushed, retrieve its digest and deploy that, not the tag. Deploying by digest guarantees the image running in production is byte-identical to the one your pipeline tested. Mutable tags are how the wrong build reaches production without anyone changing a manifest.
Vulnerability scanning runs automatically on push, but the number it produces is only useful if something acts on it — a severity threshold wired into the pipeline as a build gate.
Step 2 — Create the Cluster With Secure Defaults
In plain terms: Create the environment the containers will run in. Several of these choices cannot be changed later without rebuilding the cluster or recreating every node pool, so they are worth getting right the first time.
Before any cluster operation will succeed, the Kubernetes Engine and Artifact Registry APIs need enabling on the project, and the default project and region set.
Autopilot creation is deliberately sparse: a name, a region, a release channel and a private-nodes decision, because Google manages the node layer. Standard creation is the opposite — a longer specification where the defaults are not the ones you want, and three choices are effectively permanent.
The Settings You Cannot Change Later
These are the ones worth slowing down for. Everything else on a Standard cluster can be adjusted after the fact; these three cannot, or not without work that will never be scheduled.
Setting
Why it matters
Changeable later?
Workload Identity Federation
Without it, pods authenticate using node credentials or exported key files — the most common source of credential leaks in Kubernetes
Only by recreating every node pool
VPC-native networking (IP aliasing)
Pod and Service traffic use native VPC routes. The secondary IP ranges it derives are effectively permanent, and exhaustion cannot be fixed in place
No
Regional rather than zonal
A regional control plane spreads nodes across zones. Note that node count is specified per zone, so a three-zone region triples it — this surprises people at billing time
No
Give the Workload Access to Google Cloud APIs
With Workload Identity enabled at the cluster level, the binding itself is a short sequence: create a Google service account, grant it only the roles the application genuinely needs, allow the Kubernetes service account to impersonate it, and annotate the Kubernetes service account so the cluster knows which identity to present.
The binding string is where this goes wrong. It names a project, a namespace and a Kubernetes service account, and a mismatch in any of the three produces the same symptom — the pod authenticates as the node's default service account instead.
Verify it explicitly rather than assuming. Run a throwaway pod in the target namespace using the service account in question and ask it which identity it holds. If the answer is the Compute Engine default service account, the binding did not take.
Step 3 — Write a Deployment That Survives Restarts and Upgrades
In plain terms: Tell the cluster how to run your container: how many copies, how to health-check them, how much memory they get, and how to replace them without dropping traffic.
A Deployment containing nothing but an image reference and a replica count will deploy successfully. It will also drop traffic on every rollout, every node upgrade and every preemption. The manifest that does not do this is not much longer, but it is deliberate about five things.
The Five Settings That Prevent Downtime
Setting
What it prevents
Memory limit equal to request, and no CPU limit
Memory is incompressible — exceeding the limit means the kernel kills the process, so matching request and limit earns the Guaranteed Quality of Service (QoS) class. A CPU limit instead causes throttling, which presents as unexplained latency while the node sits at 30% utilisation
Three separate probes
A startup probe gives a slow legacy application time to boot without the liveness probe killing it mid-start. Using one probe for all three jobs is why legacy applications restart-loop on Kubernetes but ran fine on a VM
A pre-stop delay plus a generous termination grace period
Kubernetes removes the pod from the load balancer and sends SIGTERM at the same moment. Without the delay, the pod stops accepting connections before load balancers have finished draining, and clients see HTTP 502 errors
Zero maximum unavailable during rollouts
Capacity dipping below the replica count mid-deploy. A pod is added before one is removed, rather than the other way round
Topology spread constraints
The scheduler legitimately placing all three replicas on one node, turning a single node failure into a full outage
Set the pod-level security context from the first deploy rather than as a hardening pass later: non-root numeric user, no privilege escalation, all Linux capabilities dropped, root filesystem read-only with a small writable volume for temporary files.
Protect Availability During Node Upgrades
A PodDisruptionBudget sets a floor on how many replicas should remain available during voluntary disruptions such as node upgrades or autoscaler scale-down. Without an appropriate budget and sufficient replica distribution, maintenance activity may reduce application availability. The workload team remains responsible for defining and testing that availability policy.
Deploy and Verify
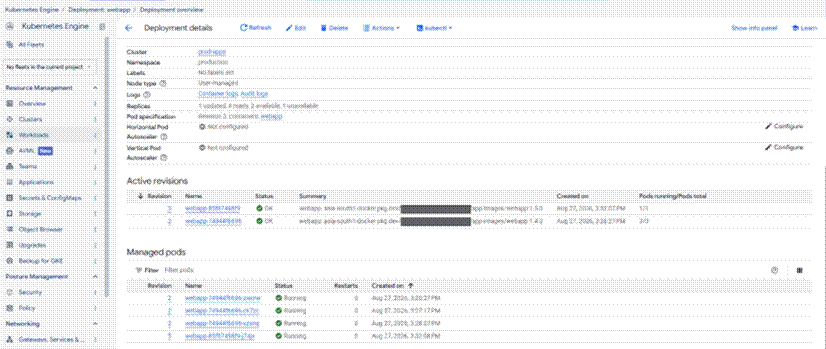
After fetching cluster credentials and applying the manifests, watch the rollout to completion rather than trusting that it finished. Two checks are worth making immediately: confirm the pods landed in different zones, and compare live CPU and memory usage against the baseline captured from the legacy system.
The temporary fourth pod in Figure 10 is the setting working correctly: capacity goes up before it comes down, so there is no window in which the service runs below its replica count.
Scale Automatically, but Only After Requests Are Set
A Horizontal Pod Autoscaler adjusts replica count against observed CPU utilisation between a floor and a ceiling. The critical detail is that it computes utilisation as a percentage of the CPU request — so an autoscaler attached to a Deployment with no CPU request does nothing at all, silently, while appearing to be configured.
Set a stabilization window on scale-down as well. Without one, spiky traffic makes the workload oscillate every fifteen seconds.
Step 4 — Cut Over Gradually, Not All at Once
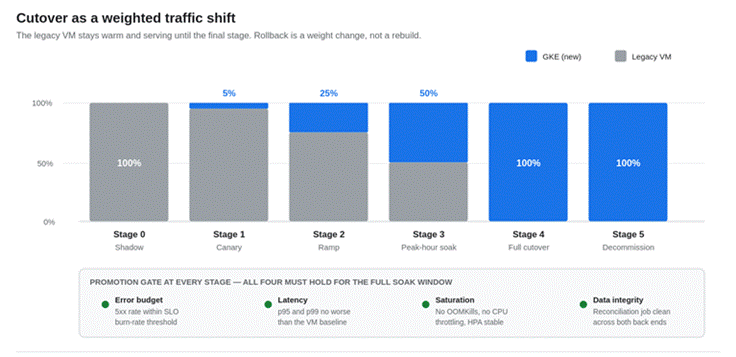
In plain terms: Move real users from the old system to the new one a slice at a time — 5%, then 25%, then 50% — checking at each stage. If something looks wrong, you move the traffic back in seconds.
A single Domain Name System (DNS) cutover gives you one shot and a rollback that takes as long as the record's time to live (TTL). A weighted shift lets you move 5% of production traffic, watch what happens, and reverse it in seconds.
The mechanism is straightforward. Expose the legacy VM to the cluster as a Service with no selector — the absence of a selector is what stops Kubernetes managing the endpoints itself and lets you point them at a machine outside the cluster — and register the VM's internal address as an endpoint. From the cluster's perspective the legacy VM is now just another backend.
With both backends addressable, an HTTP Route splits traffic between them by weight. Promotion is then a matter of editing two integers: reduce the legacy weight, raise the new one, apply. Rollback is the same edit in reverse — in seconds, with no image rebuild, no DNS propagation and no deploy pipeline anywhere in the path.
Promotion Gates: When It Is Safe to Send More Traffic
Advance on evidence, not on a schedule. All four gates must hold for the full soak window at each stage before the next weight increase.
Gate
Signal
Fail condition
Error budget
HTTP 5xx server-error rate on the new backend
Any elevation above the legacy baseline
Latency
p95 and p99 against the captured baseline
p99 above baseline for more than 5 minutes
Saturation
Out-of-memory kills, CPU throttling, autoscaler behaviour
Any out-of-memory kill, or the autoscaler pinned at its maximum replica count
Data integrity
Reconciliation across both backends
Any divergence
Soak through at least one full business cycle at 50%, including a peak-hour window and whatever your equivalent of month-end is. Migrations that look clean at three on a Tuesday afternoon routinely fail at nine on Monday morning.
Step 5 — Decommission the Legacy System Safely
In plain terms: Shut down the old system properly: stop it rather than delete it, take a snapshot first, and close off the credentials it was using.
Only after the soak window closes. The sequence is: confirm nothing still routes to the legacy backend, remove the legacy Service and its endpoints, snapshot the disks, and then stop the instance.
Stop the virtual machine before considering deletion. A short retention window gives the team time to identify undocumented dependencies, scheduled jobs, or validation gaps while preserving a reversible rollback option. The exact retention period should follow the organisation's change, backup, cost, and data-retention policies.
Deleting the disks is a separate decision, taken later, by someone with the authority to accept that it is irreversible.
Close Out the Security Posture
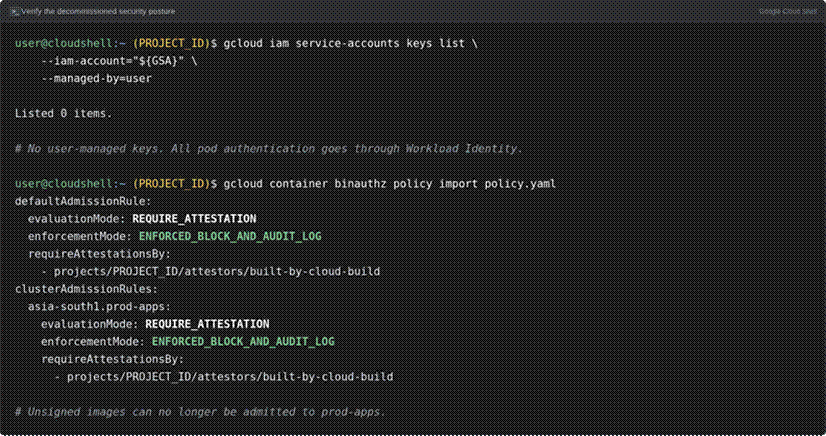
Two checks close the loop. Confirm no user-managed service account keys remain — if the identity model was built correctly there will be none — and require signed images before admission, so only artifacts your pipeline produced and attested can run in the cluster.
Move Binary Authorization from dry-run to enforced mode once the pipeline produces attestations reliably.
Seven Failure Modes and How to Diagnose Them
These seven account for the overwhelming majority of post-migration incidents. Each has a specific diagnostic.
Symptom
Root cause
Fix
CrashLoopBackOff, exit code 137, no application error
The language runtime ignores the container memory limit and sizes its heap for the whole node
Set container-aware heap sizing for the runtime in use. Confirm by describing the pod and checking for an OOMKilled last state
Pods stuck Pending
Requests exceed any schedulable node, or the pod IP range is exhausted
Describing the pod shows which. IP exhaustion needs a new node pool with a different range — it cannot be fixed in place
ImagePullBackOff
The node service account lacks Artifact Registry read access, or the manifest still points at gcr.io
Grant the Artifact Registry Reader role on the repository, and repoint the image at the regional pkg.dev host
502s on every rollout
No readiness probe, or no pre-stop delay before SIGTERM
Add a readiness probe, a pre-stop delay, and a termination grace period long enough to cover it
Worked on the VM, permission denied in the container
The application ran as root on the VM; the container runs as a non-root user
Fix ownership at build time. Do not solve this by running as root
Cannot reach Cloud SQL or Cloud Storage from the pod
The Workload Identity annotation is missing, or the Identity and Access Management (IAM) binding names the wrong namespace and service account pair
Verify with the identity check from Step 2. The binding names a project, a namespace and a Kubernetes service account, and all three must match
Data disappears after a restart
The application writes to the container filesystem
Mount a PersistentVolume or externalize the state. A read-only root filesystem catches this in staging instead of production
A container filesystem is ephemeral. Any data required after a restart must use a PersistentVolume or an external data service.
What to Handle Yourself, and What to Escalate
Not every problem in this guide is a first-line fix. These are the ones to hand on rather than work around.
Situation
Action
A symptom listed in the failure table above, with a matching diagnostic
Handle it. The fix is in the table and the diagnostic confirms the cause
Pod IP range exhausted
Escalate. This cannot be fixed in place — it needs a new node pool on a different range, which is a design change
Choosing memory and CPU requests for a workload that has never run on GKE
Escalate. Requests should come from measured usage on the legacy system, not from a guess made under deadline
Advancing or halting a canary when the gates are ambiguous
Escalate. A clear gate failure means halt. Anything less clear is a judgement call that needs the service owner
Any change to IAM bindings, Workload Identity, or Binary Authorization policy
Escalate. These are security controls; changing them to unblock a deploy is how incidents start
Deleting the legacy virtual machine or its disks
Escalate. Stopping is reversible, deleting is not. This needs the service owner's sign-off
Frequently Asked Questions
Can every virtual machine workload be migrated directly to GKE?
No. Workloads that require host access, kernel modules, specialised appliances, or unsupported licensing models may be better suited to Compute Engine or deferred until refactoring is practical.
How long should the rollback path remain available?
Keep rollback available until the migrated service has passed the agreed validation and soak criteria, including representative peak periods. The duration should be defined by the service owner and aligned with change, backup, cost, and data-retention policies.
What should be assessed before containerising a legacy application?
Start with state, storage paths, ports, external dependencies, identity, startup and shutdown behaviour, resource usage, operational ownership, and recovery requirements. The assessment should produce evidence, not only meeting notes.
Should a team choose GKE Autopilot or Standard?
Choose based on workload behaviour, operational control, governance, networking, cost allocation, and platform-management requirements. A mixed operating model may be appropriate where supported, but the decision should be validated against current Google Cloud documentation and organisational standards.
What is the safest way to cut over a production workload?
Use a staged traffic shift with measurable promotion gates for errors, latency, saturation, and data integrity. Test the rollback procedure before production traffic is moved.
Closing: The Assumptions Are the Hard Part
The main migration challenge is identifying assumptions inherited from virtual machines, including unrestricted memory, persistent local disks, root access, and predictable shutdown behaviour.
Rescheduling, upgrades, memory pressure, and autoscaling expose these assumptions during normal platform operation.
Three habits make the difference. Work workload by workload rather than in waves, so that a discovery on one does not block forty. Size from measurement rather than from the old VM's specification sheet. And make the cutover a weighted shift with a rollback you have actually executed at least once, rather than one you are confident would work.
Applied together, these practices help teams detect issues during low-risk canary stages while the legacy rollback path remains available.
Target Audience & Core Scope
Intended Reader: Hands-on engineers and operators doing the migration work, not high-level approvers.
Prerequisites: Requires Linux, container, and cloud experience; no prior Kubernetes knowledge needed.
Reading Path: Beginners must read sequentially; GKE veterans should review the initial platform updates to unlearn outdated practices.
No Copy-Paste Scripts: Omits raw code commands so teams intentionally configure their own regions, IPs, and service accounts.
Why GKE Migrations Fail Weeks After Launch
Many VM-to-GKE migrations appear successful at cutover, but issues surface later: OOMKilled events, HTTP 502 responses during rollout, or data loss from local container storage. Early workload assessment prevents most of these failures.
Kubernetes exposes assumptions that long-lived virtual machines can hide, especially around memory, storage, identity, startup, and shutdown.
The guide follows the migration lifecycle from assessment to decommissioning and focuses on decisions with lasting operational impact.
Why This Guide Exists
This guide turns recurring migration lessons into a practical review path for engineers modernising applications on Google Cloud.
What This Guide Covers
· Building a container image that behaves correctly under an orchestrator
· Creating a GKE cluster with the security and networking defaults set correctly the first time
· Writing a Deployment that survives rescheduling, rollouts and node upgrades
· Cutting over as a weighted traffic shift, with a rollback that actually works
· Decommissioning the source estate safely
· The seven failure modes behind most post-migration incidents
Key Takeaways for a VM-to-GKE Migration
• Assess each workload separately. Replatform, refactor, rehost, or defer based on evidence.
• Measure CPU, memory, ports, storage writes, dependencies, and latency before defining container resources.
• Use Workload Identity Federation instead of exported service account keys.
• Plan VPC-native networking and IP ranges before cluster creation.
• Use startup, readiness, and liveness probes for different health decisions.
• Move production traffic in controlled stages and retain a tested rollback path.
• Decommission the legacy environment only after validation, ownership approval, and retention checks.
Key Concepts
Twelve terms that the rest of this guide uses without stopping to explain. If these are already familiar, skip ahead.
Term
What it actually is
Cluster
The whole GKE environment: a control plane plus the machines that run your applications
Control plane
The Google-managed brain of the cluster. It decides what runs where. You never patch or restart it
Node
One virtual machine inside the cluster. Your application actually runs here
Pod
The smallest thing GKE runs: one or more containers that share an IP address and start and stop together. Pods are disposable and get replaced routinely
Container image
A packaged, read-only snapshot of your application and everything it needs to run
Artifact Registry
Where container images are stored so the cluster can download them
Deployment
The object that says “keep three copies of this pod running”. It recreates pods when they die and handles version upgrades
Replica
One running copy of the pod. Three replicas means three copies
Manifest
A YAML file describing what you want to exist. You send it to the cluster and the cluster reconciles reality against it
Rollout
Replacing running pods with a new version, a few at a time, without taking the service down
Probe
A health check GKE runs against your container to decide whether it is alive and whether it should receive traffic
Namespace
A folder inside the cluster that keeps one team's workloads separate from another's
Two Recent Platform Changes That Older Guides Get Wrong
Two platform changes affect migration planning and older implementation guidance.
Container Registry Is Shut Down — Artifact Registry Is the Target
Container Registry as a Google-hosted product is gone. Writes to gcr.io stopped on 18 March 2025, reads stopped on 3 June 2025, and from 14 October 2025 all gcr.io URLs are served from Artifact Registry, with anything never copied across now unavailable.
Any tutorial that tells you to configure Docker authentication with no arguments and push to a gcr.io path is describing a service that no longer accepts your images. Artifact Registry is the target, and its hostnames are regional — the location is baked into the hostname rather than passed as a setting. A repository in Mumbai lives under an asia-south1 host, and an image reference that omits the region will not resolve.
Autopilot Mode Can Now Run Inside a Standard Cluster
A Compute Class is a workload-level setting that tells GKE what kind of node to run a pod on. Autopilot ComputeClasses are now available inside Standard clusters, which means you can run specific workloads in Autopilot mode — Google-managed nodes, billed per pod request — while the rest of the cluster stays on node pools you control.
This allows a Standard cluster to retain self-managed node pools while selected, validated workloads use an Autopilot ComputeClass.
Before You Start: Choose an Approach and Confirm Readiness
Strategy is set per workload, not per estate. Most teams replatform first — container in, architecture unchanged — and refactor later, against real production telemetry rather than assumptions.
Approach
What it means
Choose it when
Replatform
Container the application with minimal change; architecture stays as it is
The app containerizes cleanly, or you are exiting a data centre on a deadline
Refactor
Decompose into services, externalize state, adopt cloud-native patterns
The workload is strategically important and release velocity is the constraint
Not every workload belongs on GKE. Infrequent jobs, appliances, or host-dependent applications may be better rehosted or deferred.
Readiness Checklist: Five Things to Confirm First
Work through these before the first workload moves. Each has an artifact that proves it is done — a written answer, a diagram, a captured baseline. “We discussed it” does not count.
Check
Done when
Statefulness audit
Every workload has a written answer to: where does it write? Anything writing to local disk needs a PersistentVolume or externalization before it moves
Network design
A Virtual Private Cloud (VPC)-native cluster, with pod and service IP ranges sized for three years of growth. Range exhaustion cannot be fixed in place
Identity model
Workload Identity enabled, so pods authenticate as a Google service account without a key file. No exported service account keys anywhere in the design
Data migration
Databases and file shares have their own track (Database Migration Service, Storage Transfer Service) with a tested rollback
Observability baseline
Current 50th, 95th and 99th percentile (p50, p95, p99) latency, error rate and resource use captured from the legacy system
An observability baseline provides the evidence needed to confirm that latency, errors, and resource behaviour have not regressed after cutover.
How to Size Containers: Measure the Workload, Do Not Copy the VM Spec
A workload on a virtual machine with 4 virtual CPUs (vCPU) and 16 GB of memory almost certainly does not need 4 vCPU and 16 GB. That figure was chosen years ago with a comfortable margin, and copying it into a resource request carries the guess forward and multiplies it by the replica count.
Instead, capture what the application actually uses over a full business cycle, month-end included. Three measurements are worth taking before anything moves:
• Peak memory and CPU across a sampling window long enough to include the busiest hour of the busiest day, not an average over a quiet afternoon.
• Every port the process is listening on. Each one becomes a Service definition, and any port nobody can account for is a finding in itself.
• Open file handles against the local filesystem, excluding shared libraries. This is the list that tells you which workloads are quietly stateful — and it is almost always longer than the team expects.
Target Architecture: What You Are Building
Workload Identity, Secret Manager, centralised logging and the VPC design are far cheaper to get right before the first workload moves than to retrofit across forty namespaces afterwards. Retrofitting Workload Identity in particular means recreating node pools — a maintenance window per cluster, which means the work never quite gets scheduled.
Step 1 — Build a Container Image That Runs Safely on GKE
In plain terms: Take the application and package it into a container image. The decisions in this one file determine whether it survives contact with Kubernetes — most images that crash in production do so because of a choice made here, weeks before anyone noticed.
Most images that fail in production fail for the same handful of reasons. They run as root. They ignore the container memory limit. They do not handle SIGTERM, the signal Kubernetes sends to ask a process to shut down. And they ship an entire operating system worth of known vulnerabilities, catalogued as CVEs — Common Vulnerabilities and Exposures.
None is exotic, and all are fixed in the build rather than at runtime. The production pattern is a multi-stage build: one stage compiles the application with the full toolchain available, a second copies only the resulting artifact onto a minimal runtime base, creates a dedicated non-root user with a numeric ID, takes ownership of the application directory, drops to that user, and starts the process container-aware.
What Each Build Decision Prevents
Decision
Prevents
Multi-stage build
Shipping the build toolchain and source code to production. Cuts image size by 60–70% and removes a whole class of findings from vulnerability scan results
Non-root numeric user ID
Rejection by Autopilot and hardened Standard clusters. Setting the user ID (UID) as a number rather than a username also lets the cluster validate that the container genuinely is not root
Container-aware heap sizing
CrashLoopBackOff with exit code 137, the signature of an out-of-memory kill. Older Java Virtual Machines read the node's total memory rather than the container limit — on a 64 GB node with a 2 GB limit, the JVM sizes its heap for 64 GB and the kernel kills it
Exit on out-of-memory
A Java Virtual Machine that has exhausted its heap but keeps its network socket open, failing health checks slowly while still accepting traffic
Test the image locally before it goes near a registry, and test it under constraint rather than on a laptop with 32 GB free — an explicit memory ceiling and a read-only root filesystem. The read-only filesystem is the important part: it surfaces every hidden write path at your desk, instead of at three in the morning when a pod reschedules.
Push to a Regional Repository, Deploy by Digest
Creating the repository and configuring Docker authentication against the regional host are one-time operations. After that the build, tag and push cycle is conventional — the only difference from older guides is the hostname, which now carries the region.
Once the image is pushed, retrieve its digest and deploy that, not the tag. Deploying by digest guarantees the image running in production is byte-identical to the one your pipeline tested. Mutable tags are how the wrong build reaches production without anyone changing a manifest.
Vulnerability scanning runs automatically on push, but the number it produces is only useful if something acts on it — a severity threshold wired into the pipeline as a build gate.
Step 2 — Create the Cluster With Secure Defaults
In plain terms: Create the environment the containers will run in. Several of these choices cannot be changed later without rebuilding the cluster or recreating every node pool, so they are worth getting right the first time.
Before any cluster operation will succeed, the Kubernetes Engine and Artifact Registry APIs need enabling on the project, and the default project and region set.
Autopilot creation is deliberately sparse: a name, a region, a release channel and a private-nodes decision, because Google manages the node layer. Standard creation is the opposite — a longer specification where the defaults are not the ones you want, and three choices are effectively permanent.
The Settings You Cannot Change Later
These are the ones worth slowing down for. Everything else on a Standard cluster can be adjusted after the fact; these three cannot, or not without work that will never be scheduled.
Setting
Why it matters
Changeable later?
Workload Identity Federation
Without it, pods authenticate using node credentials or exported key files — the most common source of credential leaks in Kubernetes
Only by recreating every node pool
VPC-native networking (IP aliasing)
Pod and Service traffic use native VPC routes. The secondary IP ranges it derives are effectively permanent, and exhaustion cannot be fixed in place
No
Regional rather than zonal
A regional control plane spreads nodes across zones. Note that node count is specified per zone, so a three-zone region triples it — this surprises people at billing time
No
Give the Workload Access to Google Cloud APIs
With Workload Identity enabled at the cluster level, the binding itself is a short sequence: create a Google service account, grant it only the roles the application genuinely needs, allow the Kubernetes service account to impersonate it, and annotate the Kubernetes service account so the cluster knows which identity to present.
The binding string is where this goes wrong. It names a project, a namespace and a Kubernetes service account, and a mismatch in any of the three produces the same symptom — the pod authenticates as the node's default service account instead.
Verify it explicitly rather than assuming. Run a throwaway pod in the target namespace using the service account in question and ask it which identity it holds. If the answer is the Compute Engine default service account, the binding did not take.
Step 3 — Write a Deployment That Survives Restarts and Upgrades
In plain terms: Tell the cluster how to run your container: how many copies, how to health-check them, how much memory they get, and how to replace them without dropping traffic.
A Deployment containing nothing but an image reference and a replica count will deploy successfully. It will also drop traffic on every rollout, every node upgrade and every preemption. The manifest that does not do this is not much longer, but it is deliberate about five things.
The Five Settings That Prevent Downtime
Setting
What it prevents
Memory limit equal to request, and no CPU limit
Memory is incompressible — exceeding the limit means the kernel kills the process, so matching request and limit earns the Guaranteed Quality of Service (QoS) class. A CPU limit instead causes throttling, which presents as unexplained latency while the node sits at 30% utilisation
Three separate probes
A startup probe gives a slow legacy application time to boot without the liveness probe killing it mid-start. Using one probe for all three jobs is why legacy applications restart-loop on Kubernetes but ran fine on a VM
A pre-stop delay plus a generous termination grace period
Kubernetes removes the pod from the load balancer and sends SIGTERM at the same moment. Without the delay, the pod stops accepting connections before load balancers have finished draining, and clients see HTTP 502 errors
Zero maximum unavailable during rollouts
Capacity dipping below the replica count mid-deploy. A pod is added before one is removed, rather than the other way round
Topology spread constraints
The scheduler legitimately placing all three replicas on one node, turning a single node failure into a full outage
Set the pod-level security context from the first deploy rather than as a hardening pass later: non-root numeric user, no privilege escalation, all Linux capabilities dropped, root filesystem read-only with a small writable volume for temporary files.
Protect Availability During Node Upgrades
A PodDisruptionBudget sets a floor on how many replicas should remain available during voluntary disruptions such as node upgrades or autoscaler scale-down. Without an appropriate budget and sufficient replica distribution, maintenance activity may reduce application availability. The workload team remains responsible for defining and testing that availability policy.
Deploy and Verify
After fetching cluster credentials and applying the manifests, watch the rollout to completion rather than trusting that it finished. Two checks are worth making immediately: confirm the pods landed in different zones, and compare live CPU and memory usage against the baseline captured from the legacy system.
The temporary fourth pod in Figure 10 is the setting working correctly: capacity goes up before it comes down, so there is no window in which the service runs below its replica count.
Scale Automatically, but Only After Requests Are Set
A Horizontal Pod Autoscaler adjusts replica count against observed CPU utilisation between a floor and a ceiling. The critical detail is that it computes utilisation as a percentage of the CPU request — so an autoscaler attached to a Deployment with no CPU request does nothing at all, silently, while appearing to be configured.
Set a stabilization window on scale-down as well. Without one, spiky traffic makes the workload oscillate every fifteen seconds.
Step 4 — Cut Over Gradually, Not All at Once
In plain terms: Move real users from the old system to the new one a slice at a time — 5%, then 25%, then 50% — checking at each stage. If something looks wrong, you move the traffic back in seconds.
A single Domain Name System (DNS) cutover gives you one shot and a rollback that takes as long as the record's time to live (TTL). A weighted shift lets you move 5% of production traffic, watch what happens, and reverse it in seconds.
The mechanism is straightforward. Expose the legacy VM to the cluster as a Service with no selector — the absence of a selector is what stops Kubernetes managing the endpoints itself and lets you point them at a machine outside the cluster — and register the VM's internal address as an endpoint. From the cluster's perspective the legacy VM is now just another backend.
With both backends addressable, an HTTP Route splits traffic between them by weight. Promotion is then a matter of editing two integers: reduce the legacy weight, raise the new one, apply. Rollback is the same edit in reverse — in seconds, with no image rebuild, no DNS propagation and no deploy pipeline anywhere in the path.
Promotion Gates: When It Is Safe to Send More Traffic
Advance on evidence, not on a schedule. All four gates must hold for the full soak window at each stage before the next weight increase.
Gate
Signal
Fail condition
Error budget
HTTP 5xx server-error rate on the new backend
Any elevation above the legacy baseline
Latency
p95 and p99 against the captured baseline
p99 above baseline for more than 5 minutes
Saturation
Out-of-memory kills, CPU throttling, autoscaler behaviour
Any out-of-memory kill, or the autoscaler pinned at its maximum replica count
Data integrity
Reconciliation across both backends
Any divergence
Soak through at least one full business cycle at 50%, including a peak-hour window and whatever your equivalent of month-end is. Migrations that look clean at three on a Tuesday afternoon routinely fail at nine on Monday morning.
Step 5 — Decommission the Legacy System Safely
In plain terms: Shut down the old system properly: stop it rather than delete it, take a snapshot first, and close off the credentials it was using.
Only after the soak window closes. The sequence is: confirm nothing still routes to the legacy backend, remove the legacy Service and its endpoints, snapshot the disks, and then stop the instance.
Stop the virtual machine before considering deletion. A short retention window gives the team time to identify undocumented dependencies, scheduled jobs, or validation gaps while preserving a reversible rollback option. The exact retention period should follow the organisation's change, backup, cost, and data-retention policies.
Deleting the disks is a separate decision, taken later, by someone with the authority to accept that it is irreversible.
Close Out the Security Posture
Two checks close the loop. Confirm no user-managed service account keys remain — if the identity model was built correctly there will be none — and require signed images before admission, so only artifacts your pipeline produced and attested can run in the cluster.
Move Binary Authorization from dry-run to enforced mode once the pipeline produces attestations reliably.
Seven Failure Modes and How to Diagnose Them
These seven account for the overwhelming majority of post-migration incidents. Each has a specific diagnostic.
Symptom
Root cause
Fix
CrashLoopBackOff, exit code 137, no application error
The language runtime ignores the container memory limit and sizes its heap for the whole node
Set container-aware heap sizing for the runtime in use. Confirm by describing the pod and checking for an OOMKilled last state
Pods stuck Pending
Requests exceed any schedulable node, or the pod IP range is exhausted
Describing the pod shows which. IP exhaustion needs a new node pool with a different range — it cannot be fixed in place
ImagePullBackOff
The node service account lacks Artifact Registry read access, or the manifest still points at gcr.io
Grant the Artifact Registry Reader role on the repository, and repoint the image at the regional pkg.dev host
502s on every rollout
No readiness probe, or no pre-stop delay before SIGTERM
Add a readiness probe, a pre-stop delay, and a termination grace period long enough to cover it
Worked on the VM, permission denied in the container
The application ran as root on the VM; the container runs as a non-root user
Fix ownership at build time. Do not solve this by running as root
Cannot reach Cloud SQL or Cloud Storage from the pod
The Workload Identity annotation is missing, or the Identity and Access Management (IAM) binding names the wrong namespace and service account pair
Verify with the identity check from Step 2. The binding names a project, a namespace and a Kubernetes service account, and all three must match
Data disappears after a restart
The application writes to the container filesystem
Mount a PersistentVolume or externalize the state. A read-only root filesystem catches this in staging instead of production
A container filesystem is ephemeral. Any data required after a restart must use a PersistentVolume or an external data service.
What to Handle Yourself, and What to Escalate
Not every problem in this guide is a first-line fix. These are the ones to hand on rather than work around.
Situation
Action
A symptom listed in the failure table above, with a matching diagnostic
Handle it. The fix is in the table and the diagnostic confirms the cause
Pod IP range exhausted
Escalate. This cannot be fixed in place — it needs a new node pool on a different range, which is a design change
Choosing memory and CPU requests for a workload that has never run on GKE
Escalate. Requests should come from measured usage on the legacy system, not from a guess made under deadline
Advancing or halting a canary when the gates are ambiguous
Escalate. A clear gate failure means halt. Anything less clear is a judgement call that needs the service owner
Any change to IAM bindings, Workload Identity, or Binary Authorization policy
Escalate. These are security controls; changing them to unblock a deploy is how incidents start
Deleting the legacy virtual machine or its disks
Escalate. Stopping is reversible, deleting is not. This needs the service owner's sign-off
Frequently Asked Questions
Can every virtual machine workload be migrated directly to GKE?
No. Workloads that require host access, kernel modules, specialised appliances, or unsupported licensing models may be better suited to Compute Engine or deferred until refactoring is practical.
How long should the rollback path remain available?
Keep rollback available until the migrated service has passed the agreed validation and soak criteria, including representative peak periods. The duration should be defined by the service owner and aligned with change, backup, cost, and data-retention policies.
What should be assessed before containerising a legacy application?
Start with state, storage paths, ports, external dependencies, identity, startup and shutdown behaviour, resource usage, operational ownership, and recovery requirements. The assessment should produce evidence, not only meeting notes.
Should a team choose GKE Autopilot or Standard?
Choose based on workload behaviour, operational control, governance, networking, cost allocation, and platform-management requirements. A mixed operating model may be appropriate where supported, but the decision should be validated against current Google Cloud documentation and organisational standards.
What is the safest way to cut over a production workload?
Use a staged traffic shift with measurable promotion gates for errors, latency, saturation, and data integrity. Test the rollback procedure before production traffic is moved.
Closing: The Assumptions Are the Hard Part
The main migration challenge is identifying assumptions inherited from virtual machines, including unrestricted memory, persistent local disks, root access, and predictable shutdown behaviour.
Rescheduling, upgrades, memory pressure, and autoscaling expose these assumptions during normal platform operation.
Three habits make the difference. Work workload by workload rather than in waves, so that a discovery on one does not block forty. Size from measurement rather than from the old VM's specification sheet. And make the cutover a weighted shift with a rollback you have actually executed at least once, rather than one you are confident would work.
Applied together, these practices help teams detect issues during low-risk canary stages while the legacy rollback path remains available.
Target Audience & Core Scope
Intended Reader: Hands-on engineers and operators doing the migration work, not high-level approvers.
Prerequisites: Requires Linux, container, and cloud experience; no prior Kubernetes knowledge needed.