What if you could give your users secure access to internal applications — without a VPN, without opening firewall ports, and without compromising on security? Sounds too good to be true? It's not. Microsoft Entra Private Access makes this a reality, and in this blog, I'm going to walk you through the entire setup — from zero to a fully working secure connection — with real screenshots from a live demo environment.
Whether you're an IT admin exploring Zero Trust Network Access (ZTNA) for the first time, or a seasoned engineer looking to replace your legacy VPN infrastructure, this walkthrough will give you a clear, practical understanding of how Entra Private Access works end-to-end. Let's dive in.
Why Entra Private Access?
Let's be honest — VPNs have served us well for decades, but they come with serious baggage. They expose broad network segments, require inbound firewall rules, offer a clunky user experience, and lack granular identity-aware controls. In a world where users work from anywhere and threats are everywhere; VPNs simply don't cut it anymore.
Microsoft Entra Private Access flips the model. Instead of tunnelling users into your entire network, it provides app-level access — only to the specific resources they need, only when their identity and device posture meet your policies. No inbound ports. No broad network exposure. Just secure, identity-driven access powered by Microsoft's Security Service Edge (SSE) platform.
What You'll Need Before You Start
Before we jump into the configuration, make sure you have these ready:
Microsoft Entra Suite (or)
Microsoft Entra ID tenant with P1 or P2 and standalone Entra Private Access license
Outbound Ports to be open 80, 443
A Private Network Connector installed on an on-premises server or VM with line-of-sight to your internal resources
A Windows 11 client device for testing
The Global Secure Access (GSA) Client installer — downloadable from the Entra admin center
Let's Get Started — Enabling the Private Access Profile
First thing — we need to tell Microsoft Entra to start routing private access traffic. Head over to the Microsoft Entra admin center → Global Secure Access → Traffic forwarding. You'll see three profiles here: Microsoft traffic, Private access, and Internet access.
Toggle the Private access profile to Enabled. This is the switch that activates the entire Private Access pipeline for your tenant. You'll also want to assign the appropriate users and groups so that their traffic gets forwarded through the service.
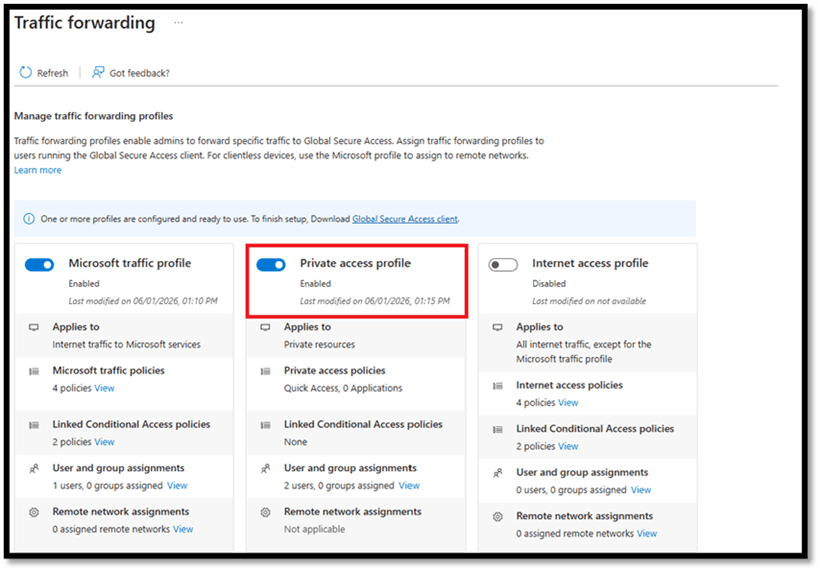
Enabling the Private Access Profile in the Traffic Forwarding settings
Setting Up the Connectors
Think of connectors as the bridge between Entra ID and your on-premises network. They're lightweight agents that sit inside your network and establish secure outbound connections to Microsoft's cloud — no inbound firewall rules required.
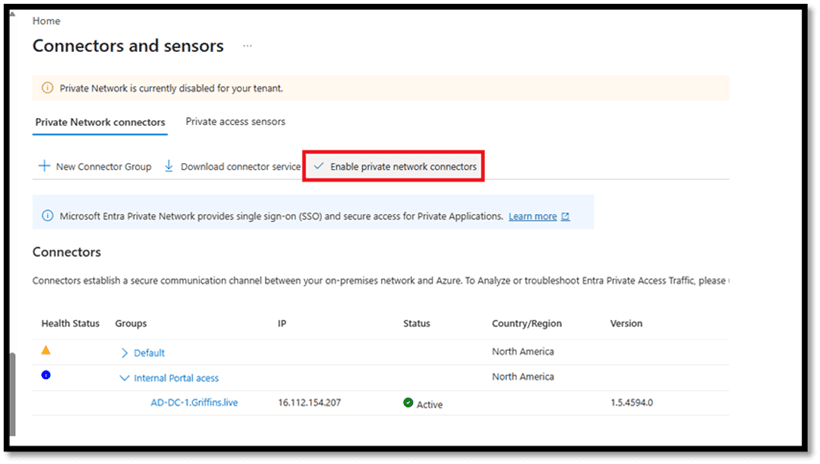
Download the Connector and install it on one of the Member servers which have access to the internal application server.
Navigate to Global Secure Access → Connectors and sensors → Private Network connectors. Click "Enable private network connectors" to activate the capability. Once enabled, you'll see your installed connectors listed with their health status, IP address, and version. Make sure your connector shows as Active — that confirms it's successfully communicating with Azure.
Private Network Connectors enabled — our connector is Active and healthy
Next, we need to create a Connector Group. This lets you logically organize connectors and assign them to specific applications. Click "+ New Connector Group", give it a name (we used "Internal Portal access"), select your connector (AD-DC-1.Griffins.live), and choose the region closest to your resource for optimized routing.
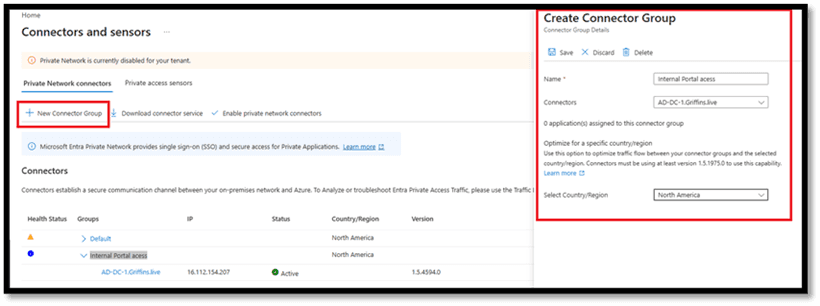
Creating a dedicated Connector Group for our Internal Portal
Defining the Internal Application
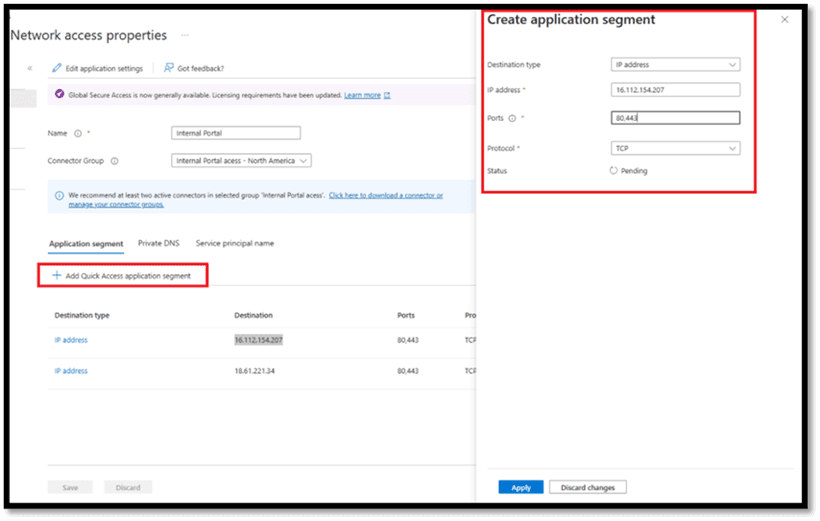
Now telling to Entra exactly what internal resources we want to protect and publish. Navigate to Enterprise applications → your application ("Internal Portal") → Network access properties.
Click "+ Add Quick Access application segment" and configure the following in the Create application segment panel:
Destination type: IP address
IP address: 16.112.154.207 (our internal web server)
Ports: 80, 443
Protocol: TCP
Hit Apply, and you've just defined exactly which internal resource should be accessible through Entra Private Access. You can add multiple segments if your application spans several endpoints or services.
Configuring the Application Segment — destination IP, ports, and protocol
Controlling Who Gets Access
Zero Trust means no one gets access by default — not even your own employees — until they're explicitly granted it. Navigate to the enterprise application → Users and groups and click "+ Add user/group".
In our demo, we've assigned "User2" to the Internal Portal application. Only this user (and any additional users or groups you assign) will be able to reach the internal resource. Everyone else? Access denied. This is the principle of least privilege in action.
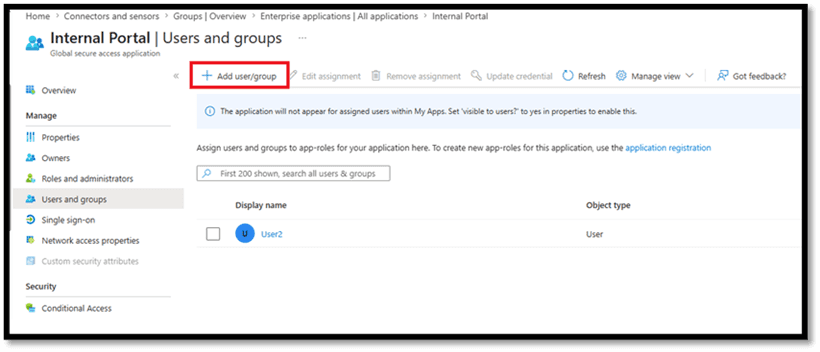
Only assigned users can access the Internal Portal — Zero Trust in action
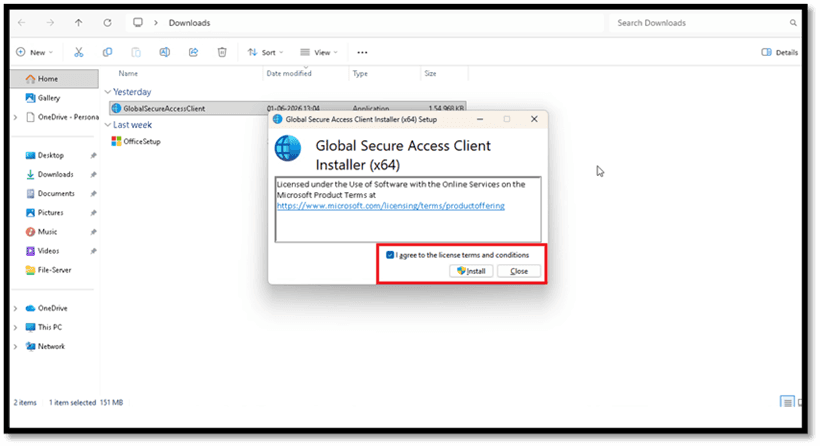
The Client Side — Installing Global Secure Access
On the user's device, the experience is refreshingly simple. Download the Global Secure Access Client from the Entra admin center, run the installer, accept the license terms, and click Install. The whole process takes less than a minute.
Once installed, the GSA client runs quietly as a system service. It handles all traffic forwarding transparently — users don't need to manually connect to anything. No VPN dialers, no remembering server addresses, no frustration.
Installing the Global Secure Access Client — accept the license and click Install
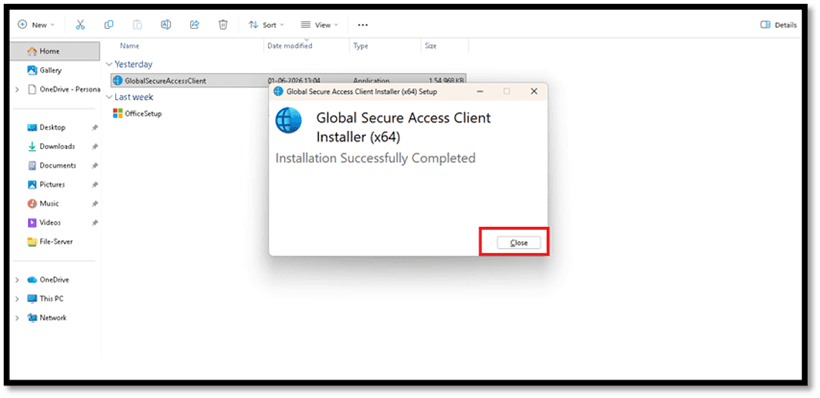
Installation complete — that was quick!
Is Everything Healthy? Let's Check
Before we test access, let's make sure everything is running smoothly. Open the GSA client's Advanced diagnostics → Health check tab. This runs a comprehensive battery of checks — internet connectivity, tunneling service, engine service, forwarding profile, driver, DNS resolution, policy server reachability, and more.
The magic words we're looking for? "All checks are successful” with every single item showing a green checkmark and True. That's exactly what we got. We're ready for the real test.

All health checks passed — we're good to go!
The Moment of Truth — Before vs After
This is where it all comes together. We're going to show you exactly what happens when Private Access is disabled versus enabled. The difference is night and day.
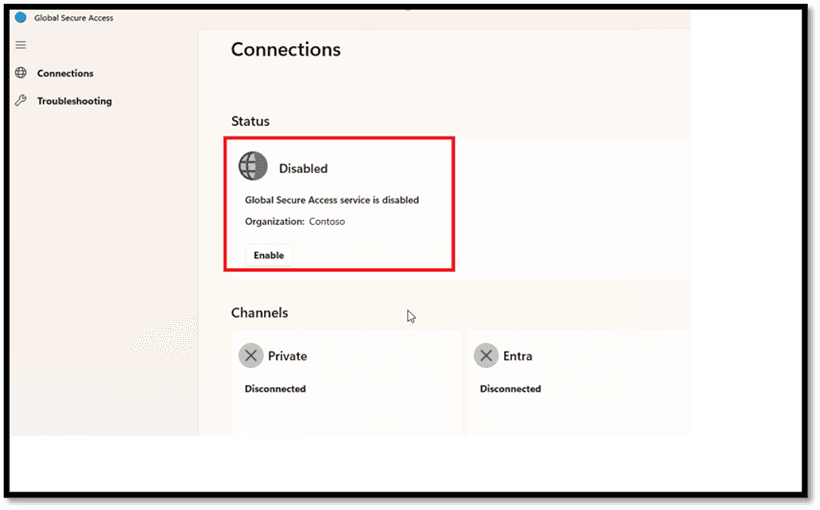
Without Private Access — Connection Refused
With the Global Secure Access service disabled, the client shows a "Disabled" status. All channels — Private and Entra — appear as Disconnected. The client isn't tunnelling any traffic; it's essentially sitting idle.
GSA Client disabled — all channels disconnected
Now let's try accessing our internal portal at 18.61.221.34 in the browser. The result? "Hmmm... can't reach this page” ERR_CONNECTION_RESET. The internal application is completely unreachable over the internet. This is exactly how a private resource should behave — invisible and inaccessible to anyone who isn't authorized through the proper channel.
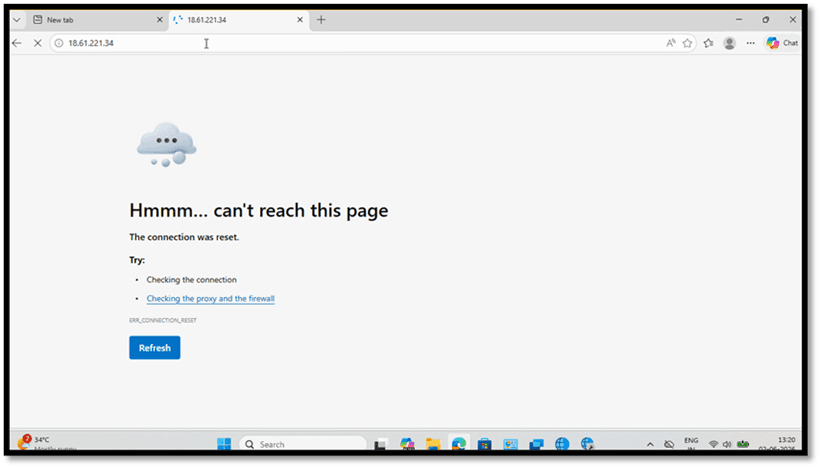
Trying to access the internal portal... no luck. Connection reset.
With Private Access — Access Granted!
Now, let's enable the Global Secure Access service. The status immediately flips to "Connected" and all three channels — Private, Entra, and M365 — light up green. The client is now actively tunnelling traffic through Microsoft's secure network. Notice that User2 is signed in — matching our earlier user assignment perfectly.
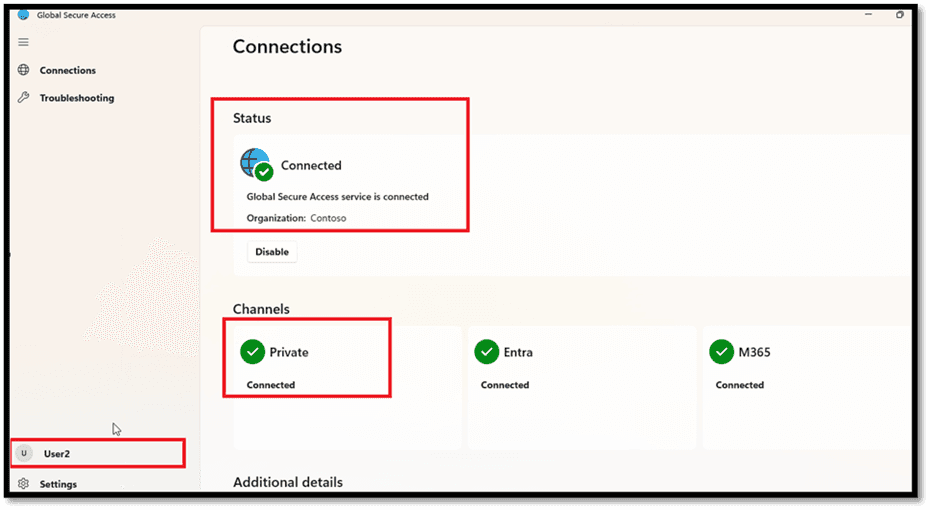
GSA Client connected — Private, Entra, and M365 channels are all green
And now, the moment we've been building towards. We refresh the browser, navigate to 18.61.221.34, and... the Contoso Internal Portal loads beautifully! 🎉
"Access Granted — Secured by Zero Trust” that banner says it all. The connection details confirm the traffic flowing through the GSA tunnel to the internal server at 10.x.x.x. This page is only reachable through the GSA tunnel — exactly as designed. No VPN. No firewall holes. Just pure, identity driven Zero Trust access.
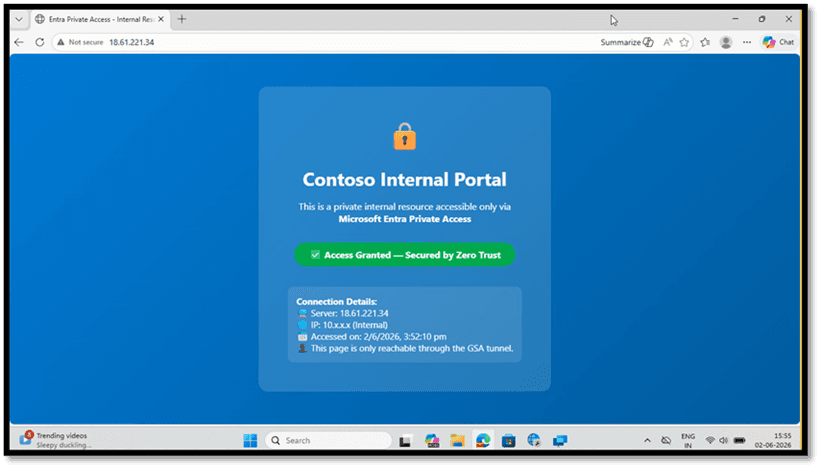
The Contoso Internal Portal loads perfectly — Access Granted, Secured by Zero Trust!
What Makes This Powerful
Let's take a step back and appreciate what we just accomplished:
No VPN required — Users access internal apps securely over the internet without ever connecting to a VPN. The experience is seamless and invisible.
No inbound firewall rules — The connector initiates outbound connections only. Your firewall stays locked down. No ports to open, no attack surface to worry about.
Identity-driven access — Powered by Microsoft Entra ID, every access request is authenticated and authorized. Combine it with Conditional Access for MFA, device compliance, and location-based policies.
Seamless user experience — The GSA client handles everything transparently. Users just open their browser and access the app — no extra steps, no VPN dialers, no friction.
True Zero Trust foundation — Verify explicitly, enforce least privilege, and assume breach. Entra Private Access embodies all three principles.
Scalable architecture — As your environment grows, simply add more connectors and connector groups. The architecture scales horizontally with your needs.
Wrapping Up
If you've made it this far, you've seen the full journey — from enabling the traffic forwarding profile and configuring connectors, to defining application segments, assigning users, installing the client, and finally witnessing the dramatic before-and-after of Private Access in action.
The setup is straightforward, the user experience is seamless, and the security posture is leagues ahead of traditional VPN. Microsoft Entra Private Access isn't just an incremental improvement — it's a fundamental shift in how we think about remote access to internal resources.
Whether you're modernizing your remote access strategy, decommissioning legacy VPN appliances, or building a Zero Trust foundation from the ground up — Entra Private Access deserves a spot at the top of your evaluation list. The future of secure private access is here. It's time to embrace it.
