A Complete Hands-On Walkthrough — From Configuration to Secure Application Elevation
What if your users could install approved applications, run PowerShell scripts, or launch administrative tools without ever becoming local administrators?
For years, IT administrators have been forced to choose between two bad options:
Give users permanent administrator rights and increase security risk.
Remove administrator rights and create endless helpdesk tickets.
Microsoft Endpoint Privilege Management (EPM) changes that completely.
Instead of making users local administrators, EPM provides Just-in-Time (JIT) privilege elevation for only the applications you trust—and only when your policies allow it.
In this hands-on guide, I'll walk you through the complete deployment of Endpoint Privilege Management using Microsoft Intune. We'll start with the basics, configure the required policies, create elevation rules, walk through the end-user experience, and finish by approving an elevation request from the Intune Admin Center.
If you're planning to implement Least Privilege, embrace Zero Trust, or simply eliminate permanent administrator accounts from your Windows devices, this guide is for you.
Let's get started.
Why Endpoint Privilege Management?
Let's face it.
One of the biggest security problems in enterprise environments isn't malware.
It's local administrator rights.
Many users receive permanent administrator privileges simply because they occasionally need to install software, update drivers, or run diagnostic tools. Unfortunately, attackers love administrator accounts because they make privilege escalation much easier after compromising a device.
Microsoft Endpoint Privilege Management solves this challenge by allowing organizations to keep users as Standard Users while still permitting approved administrative actions whenever they're needed.
Instead of elevating the user, EPM elevates only the approved application.
The result?
Better security
Better compliance
Better user experience
Fewer helpdesk tickets
What You'll Need Before You Start
Before configuring Endpoint Privilege Management, make sure your environment meets Microsoft's requirements.
You'll need:
Microsoft Intune Plan 1
Endpoint Privilege Management Add-on or Microsoft Intune Suite
Windows 11 (supported versions)
Intune-enrolled devices
Microsoft Entra Joined or Hybrid Joined devices
Intune Administrator permissions
Once everything is in place, we're ready to enable Endpoint Privilege Management.
Let's Get Started — Enabling Endpoint Privilege Management
Sign in to the Microsoft Intune Admin Center.
Navigate to:
Endpoint Security → Endpoint Privilege Management
You'll notice that Endpoint Privilege Management uses two policy types.
Elevation Settings Policy
Elevation Rules Policy
We'll configure both.
Creating the Elevation Settings Policy
The Elevation Settings Policy enables Endpoint Privilege Management on Windows devices.
Click:
Policies → Create Policy
Select:
Platform: Windows
Profile: Elevation Settings Policy
Provide a policy name and description before moving to the configuration page.

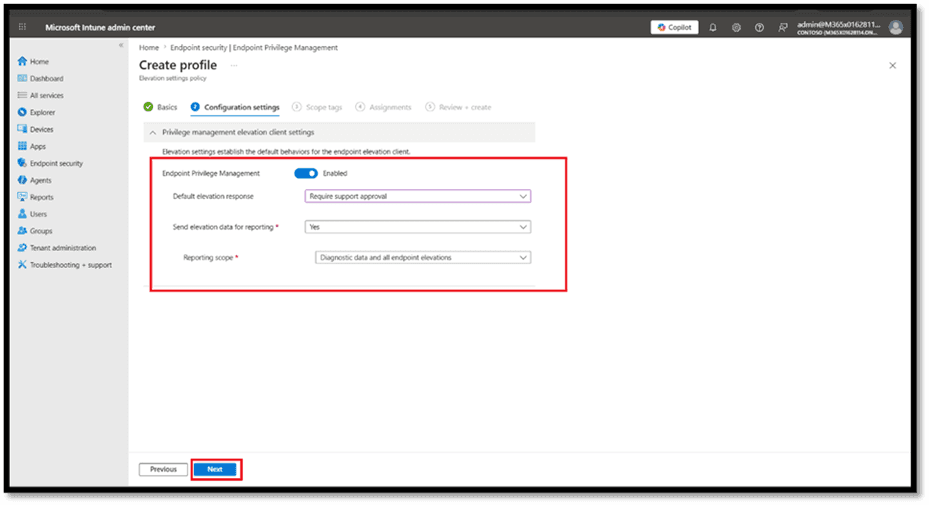
Configuring the Elevation Settings
Now comes the important part.
Enable Endpoint Privilege Management.
For Default Elevation Response, choose:
Require Support Approval
This means users can request administrator rights, but nothing runs until an administrator approves the request.
It's one of the safest configurations for production environments.
Assign the Policy
Assign the policy to your Windows device group.
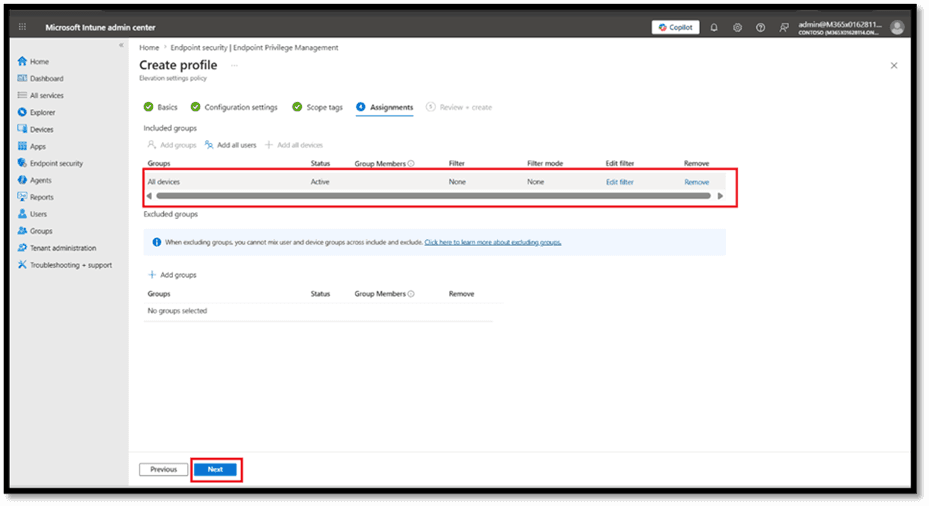
For production environments, it's recommended to begin with a pilot group before rolling out organization-wide.
Once assigned, click Review + Create.
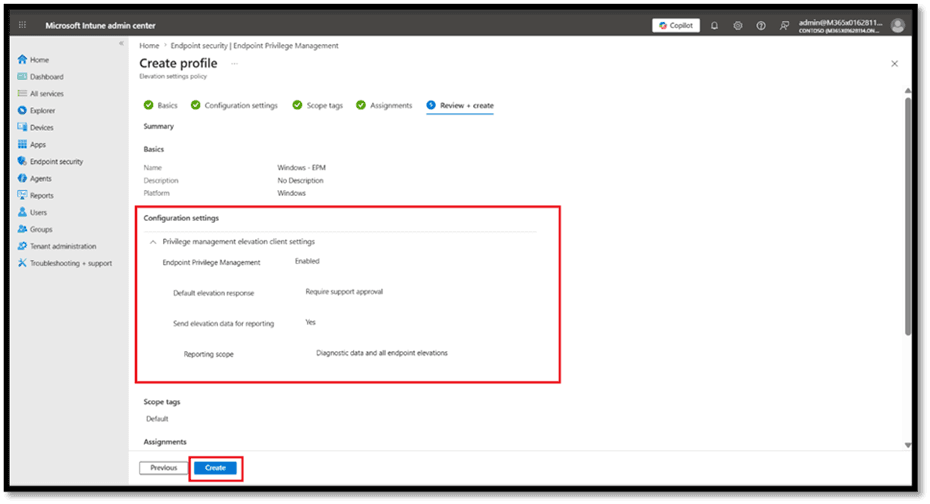
Congratulations!
Endpoint Privilege Management is now enabled on your devices.
Creating Elevation Rules
Enabling EPM alone isn't enough.
You now need to tell Intune which applications are allowed to run with elevated privileges.
That's where Elevation Rules come in.
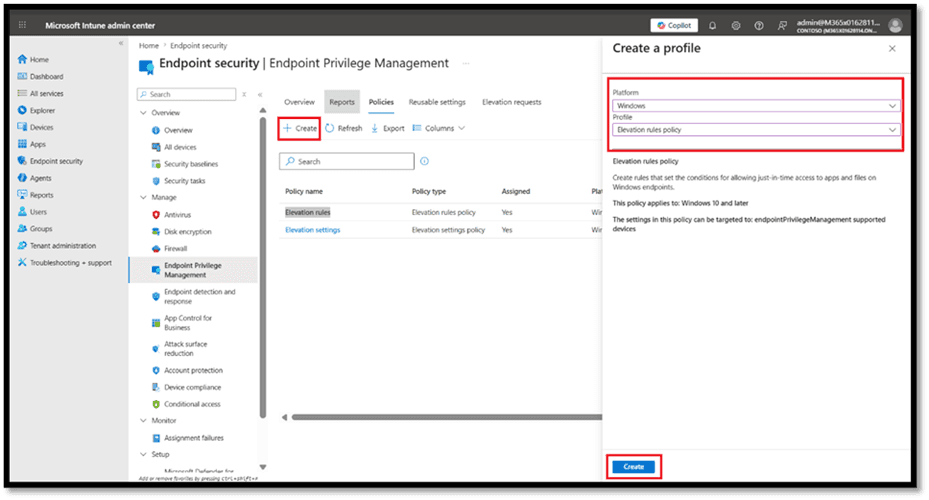
Navigate to:
Endpoint Security → Endpoint Privilege Management → Policies
Click:
Create Policy
Choose:
Platform: Windows
Profile: Elevation Rules Policy
Configuring an Elevation Rule
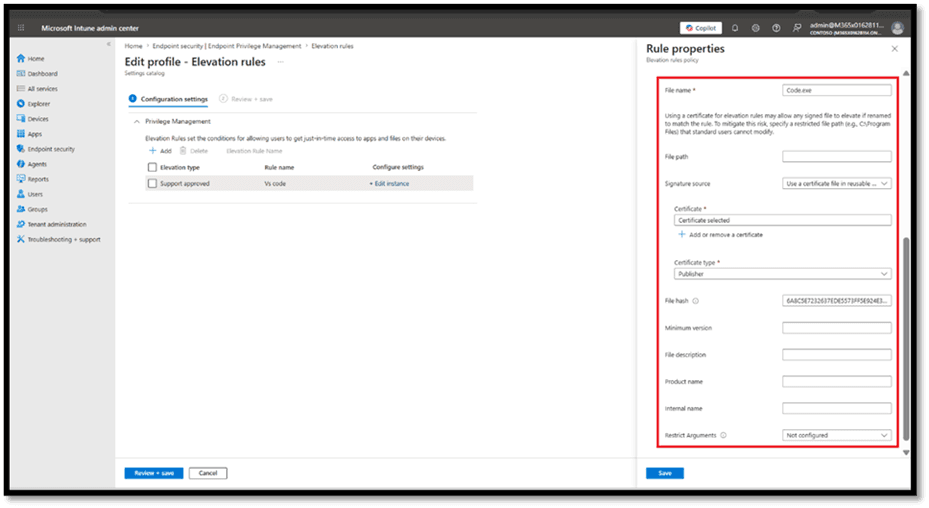
Each rule describes a trusted application.
You can identify applications using:
File Name
File Hash
Publisher Certificate
File Path
Product Name
Internal Name
Version
Microsoft recommends using publisher certificates combined with file hashes whenever possible for better security.
Choosing an Elevation Type
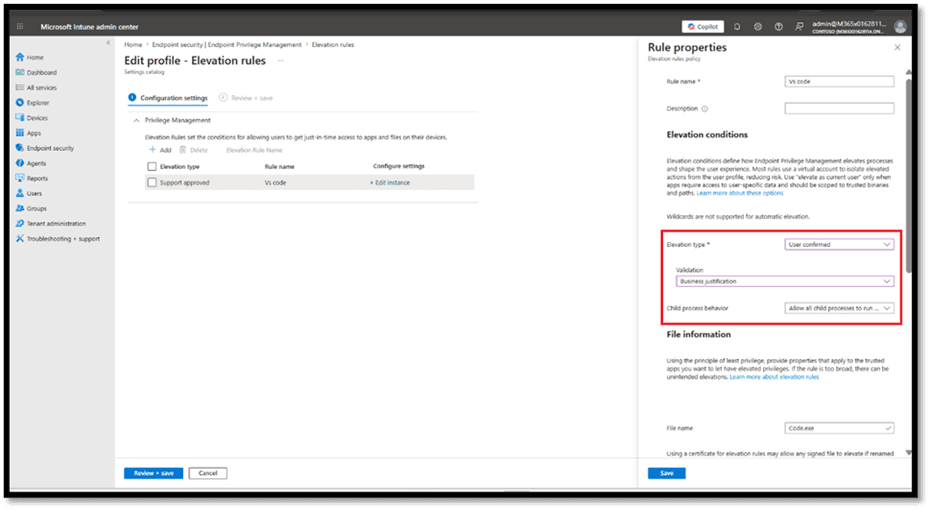
Every rule requires an elevation method.
User Confirmed
This is Microsoft's recommended option.
When users launch the application:
They receive an elevation prompt.
They provide a business justification.
Windows can optionally require authentication.
This keeps users informed while maintaining strong security controls.
Automatic
Automatic elevation skips all prompts.
The application immediately launches with administrator privileges.
Only use this for highly trusted applications because poorly designed automatic rules could unintentionally elevate unwanted software.
Getting the Certificate and File Hash
To create a secure rule, you'll usually need both the publisher certificate and the application's hash.
Export the certificate using:
Get-AuthenticodeSignature pathToFile |
Select-Object -ExpandProperty SignerCertificate |
Export-Certificate -Type CERT -FilePath outputPath
Retrieve the file hash using:
Get-FileHash pathToFile
Add these values to your elevation rule before saving the policy.
The End User Experience
Now let's see what happens from the user's perspective.
Suppose a standard user downloads an approved application.
Normally, Windows would display a UAC prompt requesting administrator credentials.
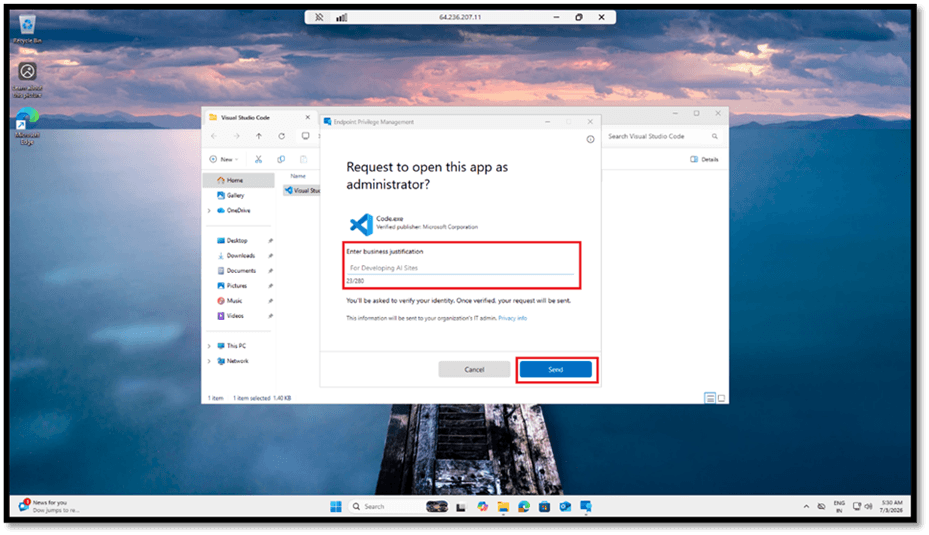
Instead, the user simply:
Right-clicks the application
Selects Run with elevated access

A request window appears asking for a business justification.
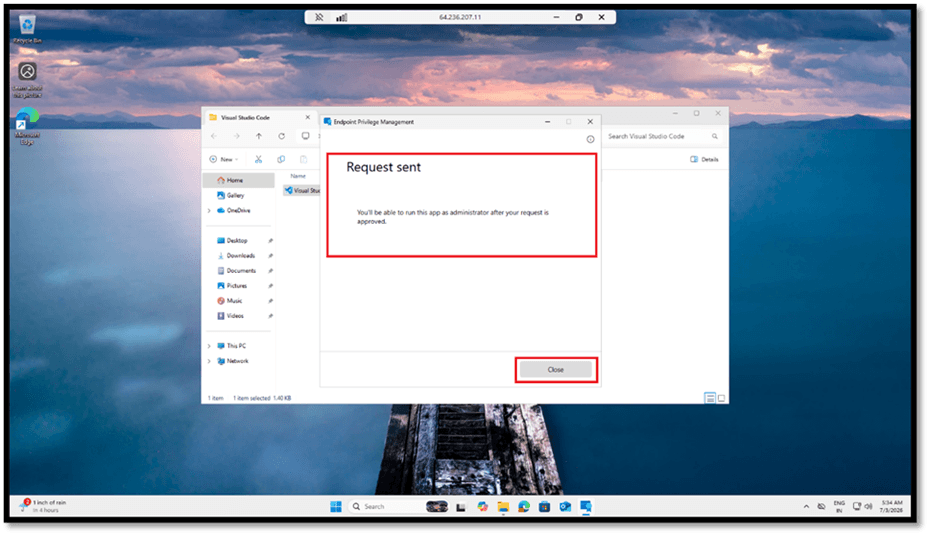
The user explains why elevation is required and clicks Send.
That's it.
No administrator password.
No helpdesk call.
Just a simple approval workflow.
Reviewing the Request in Intune
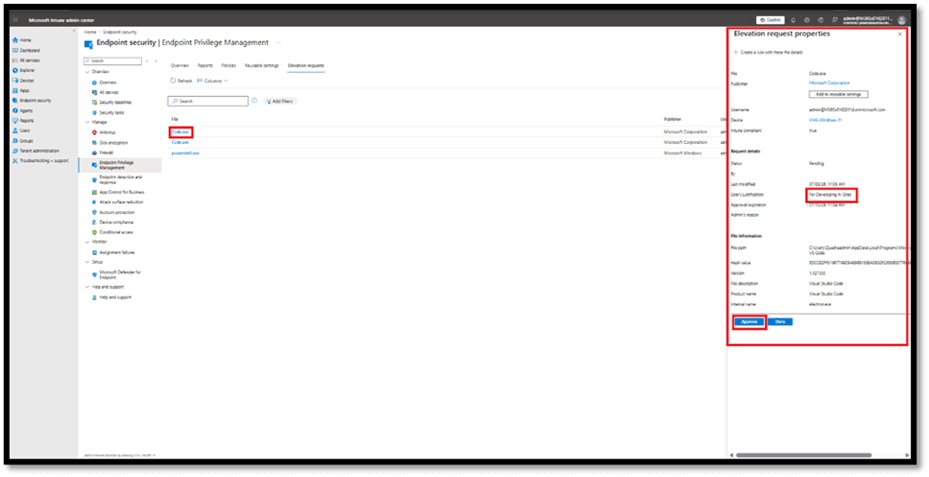
Back in the Intune Admin Center, administrators can review pending elevation requests.
Navigate to:
Endpoint Privilege Management → Elevation Requests
Each request contains valuable information including:
User
Device
Application
File Name
Requested Time
Business Justification
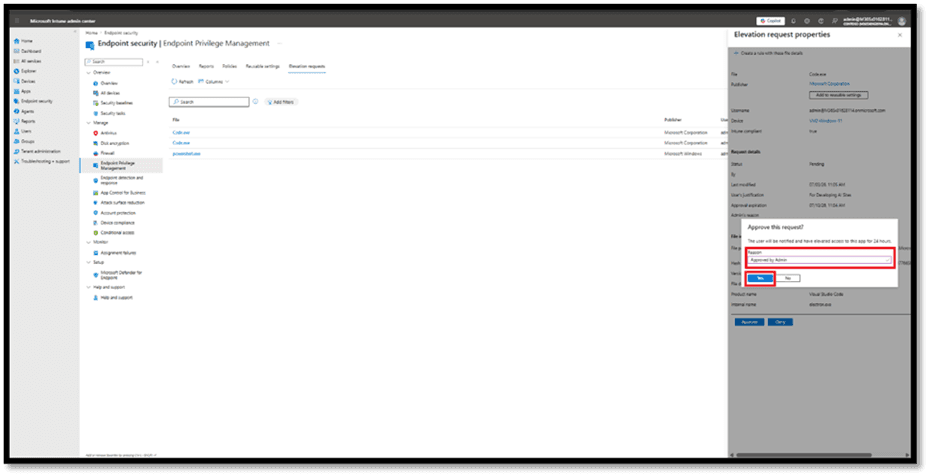
The administrator can either:
Optionally, a reason can also be provided.
Once Approved…
After approval, the user receives confirmation.
They simply right-click the application again and select:
Run with elevated access
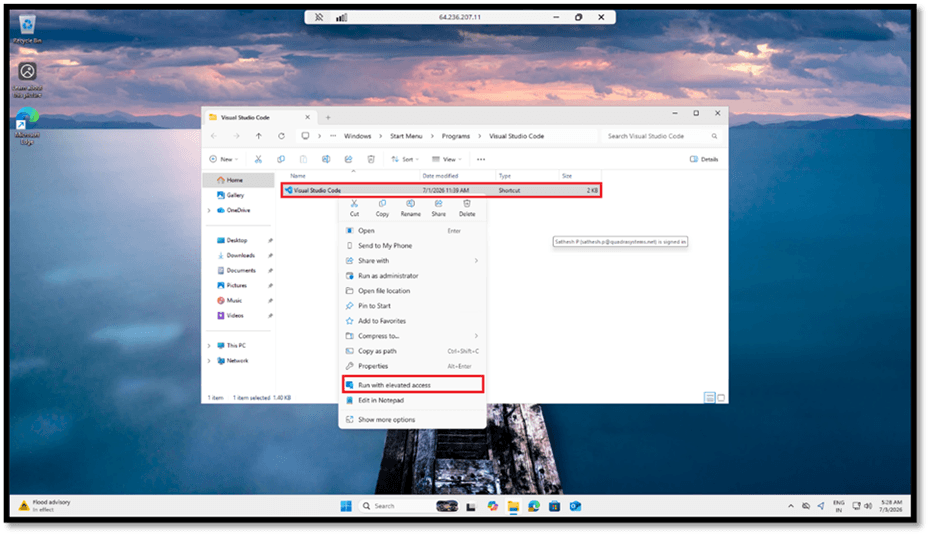
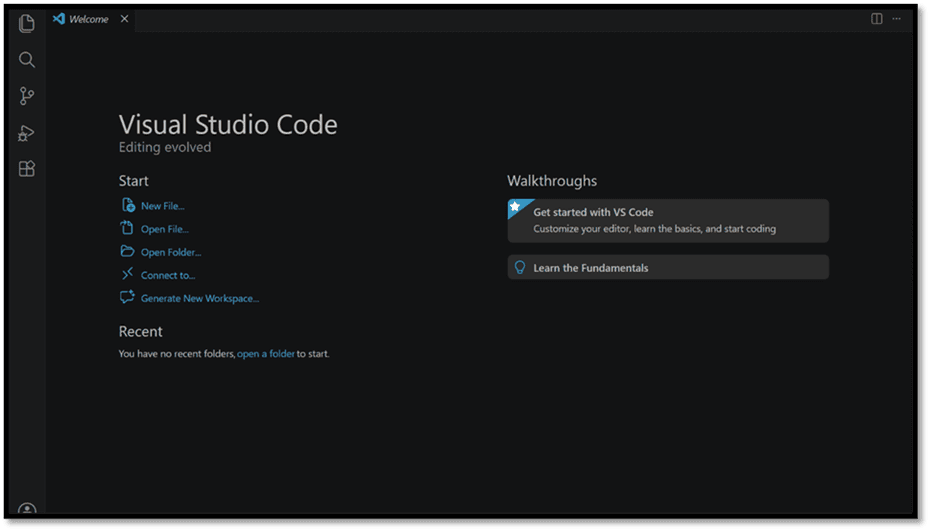
This time, the application launches successfully with administrator privileges—without exposing administrator credentials or granting permanent local admin rights.
Why This Is Such a Big Deal
Let's pause for a moment and appreciate what we've achieved.
✔ Users remain Standard Users
✔ No permanent administrator accounts
✔ Approved applications run securely
✔ Every elevation is audited
✔ Helpdesk workload decreases
✔ Zero Trust principles are enforced
✔ Better compliance reporting
✔ Improved endpoint security
All while maintaining a seamless experience for end users.
Best Practices
Before rolling out Endpoint Privilege Management across your organization, here are a few recommendations that have consistently worked well in production environments.
Start Small
Deploy EPM to a pilot group first.
Monitor request patterns before expanding further.
Prefer Support Approval
Support approval provides the strongest balance between usability and security.
Avoid Broad Rules
Don't create wildcard path rules or overly broad publisher rules.
Granular rules always provide better protection.
Review Reports Regularly
Audit elevation requests frequently.
Look for:
Frequently elevated applications
Repeat requests
Suspicious activity
Opportunities to optimize policies
Pros and Cons
Advantages
✔ Native Microsoft Intune integration
✔ Supports Zero Trust
✔ Eliminates permanent local administrators
✔ Improves compliance
✔ Detailed auditing and reporting
✔ Better user productivity
✔ Reduces helpdesk requests
Limitations
Additional licensing required
Windows-only solution
Requires careful rule planning
Poorly designed rules can weaken security
Wrapping Up
If you've followed along, you've now seen the complete journey—from enabling Endpoint Privilege Management and creating elevation settings, to defining application rules, submitting elevation requests, and approving them through Microsoft Intune.
The beauty of Endpoint Privilege Management is that it removes the long-standing trade-off between security and productivity. Users no longer need permanent local administrator rights to get their work done, and IT teams no longer must choose between protecting endpoints and keeping employees productive.
Whether you're implementing Least Privilege, reducing your organization's attack surface, or strengthening your Zero Trust strategy, Endpoint Privilege Management is one of the most valuable capabilities available in Microsoft Intune today. With thoughtful planning and well-designed elevation rules, you can modernize endpoint administration while maintaining a secure and seamless user experience.
